
Tools required:
- Two large mixing containers
- Smaller mixing containers for accent colors if desired
- Spray bottles (one with just isopropyl alcohol; additional accent colors should have their own)
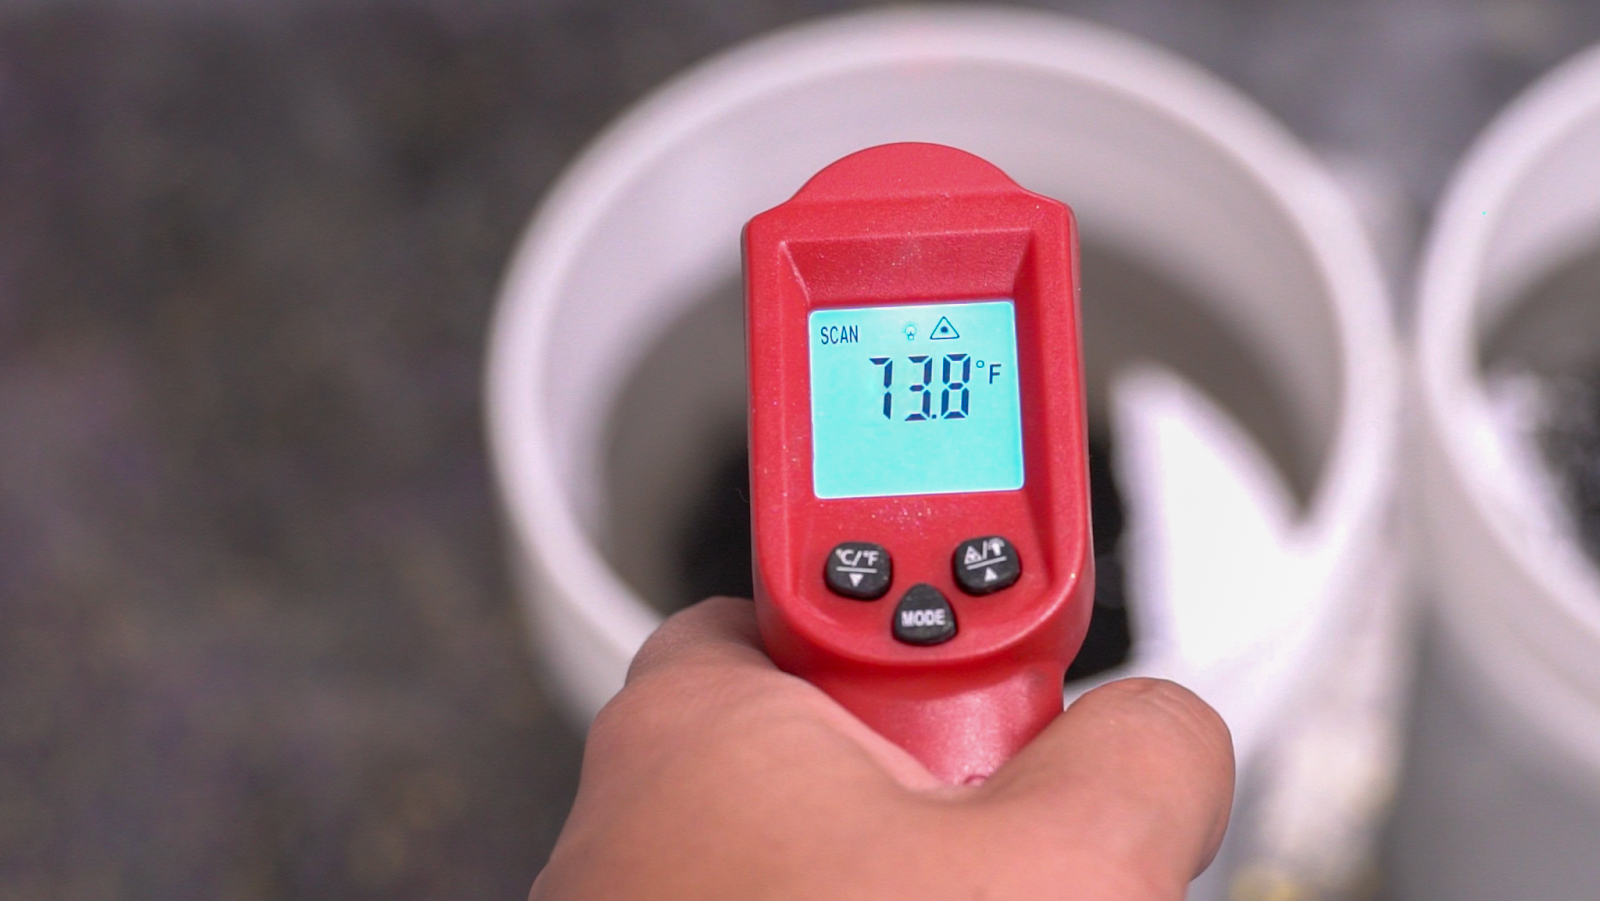
- Temperature gun aka Infrared gun
- Long mixing sticks
- Power Drill and plastic paddle mixers (for 2+ gallon mixtures)
- T-bar(s) & T-bar cover(s)
- Steel Blade/Skimming blade or Putty knife with an extension handle
- A ¼” V-notched Squeegee if desired
- Foam Roller with extension handle
- Gypsum Powder or SuperTraxx Sand (if patch work is needed)
- Stand up grinder or handheld grinder/sander
- 99% Isopropyl Alcohol
- Xylene (if there is oil in that slab that needs addressed)
- Disposable nitrile gloves
- Box of Rags
- Painters Tape
- A timer of some sort
- Fire extinguisher… just in case!
Key Terms:
-
Skim coat - A thin application of clear epoxy used to seal a porous substrate. Skim coats are often referred to as ‘seal coats,’ they are one in the same.
-
Flood coat - The aesthetic epoxy pour that is poured out onto your substrate; clear or colored.
-
Slurry Mixture - What we use for patch work; one part mixed epoxy + one part unactivated gypsum powder.
-
Kinetic Sand Mixture - What we use for significant patch work; 10% mixed epoxy + 90% SupperTraxx Sand.
-
Working time frame - The amount of working time you have once instructions have been followed and product is immediately poured out of the containers.
-
Pot Life - The amount of time mixed product can sit in the container - also a word we typically never use when working with flooring epoxies. We encourage you to follow instructions and keep track of your temperatures with aTemperature gun.
-
Flash Cure - When mixed epoxy sits in a container too long OR when environmental/product temperatures were too high to begin with, resulting in quickly increasing temperatures that solidify the epoxy making the product unusable. Be cautious as flash cures can result in burning of the skin and smoking in the container.
-
Granular - A speckled ‘design’ commonly seen in granite, quartz and similar natural stone countertops that can be mimicked with our Metallic Powders.
-
Veining - A fractured mineral deposit ‘design’ commonly seen in natural stones such as granite, marble and quartz.
-
Dirty Pour - A ‘design’ where a batch (or multiple batches) of various colors of epoxy are poured out of the container onto a substrate.
-
Marble Floor - A ‘design’ where two or more colors are sporadically distributed throughout the project and very lightly blended together.
-
Broadcast - This term refers to evenly distributing aggregate to the surface of an epoxy project either by hand or with a mini leaf blower.
Bear in mind temperatures
Temperatures matter! Start by ensuring that the ambient temperature of the room is in the goldilocks temperature zone between 70°-75° degrees Fahrenheit (21°-24° celcius). We advise the room be at this setting about 24 before and after the start of your project.
Product temperatures can drastically vary during transit throughout certain times of the year. With our infrared Temperature gun, temp your epoxy to ensure it is in the goldilocks temperature zone as well. Do not assume that because it has sat in the same room for a couple hours that it will be the same temperature. Epoxy is of a thicker consistency than water and will take time to acclimate to its surroundings. While allowing the product to acclimate naturally, please note that if the epoxy sits along a furnace, cold wall or window - this can drastically affect the performance of the epoxy.
-
We do not recommend any type of temperature acclimating methods - let it adjust naturally.
-
Lower temperatures below 70° can result in a softer cure with an extended cure time.
-
Higher temperatures above 75° can result in the epoxy setting up quicker thus cutting back on your working time and making it difficult for the epoxy to evenly level itself.
For experienced epoxy enthusiasts only: Our Ultra Flex Epoxy is very unique in that it can be somewhat forgiving in slightly cooler environments. If you opt to do this pour in a colder environment, expect your working time to extend along with the time it takes for it to cure. Bear in mind it is still recommended to mix the product in a goldilocks temperature environment.
Step 1: Prep Work
In order to have a long lasting epoxy floor coating that adheres, you must use your best judgment to ensure your floor is a good candidate. Once you’ve deemed it a good candidate, remember, prep is key!
Declutter the working area. Shut off any airflow. Limit traffic in the area in order to prevent debris from landing in your project. Caulk plumbing, electrical or gas penetrations and under baseboards if necessary. Block floor registers with foil tape. Clean your substrate with household cleaning products free from oil or water. Isopropyl alcohol works just fine.
Fill the lows
Clean the area with alcohol - never water. Use alcohol to expel moisture in the areas you are about to patch. Use xylene to expel oil in an area you are about to patch.
Open fractures or tight saw cuts on concrete with a chase saw (Image A). We want a slightly wider opening on the surface to not only have a smoother finish on the surface but to funnel your filler into the crevasse. Fill low spots, including expansion joints and spalled areas, with either:
-
Our kinetic sand mixture (Image B)when filling large voids where the sand adds additional psi durability.
-
Our Non-Sag Wall Epoxy (Image C)for indoor applications only; refer to the Non-Sag Wall Epoxy Instructions for application guidance.
-
A slurry mixture (Image D)for indoor or outdoor usage.
Never use any water based products for patch work (such as concrete patch or tile mortar) as those products will require nearly 4 weeks for them to gas off prior to you being able to continue with this project. By doing our patch work methods - you will be able to continue within 12-24 hours after the patched areas have cured. Dap Spackling or Bondo is acceptable for much smaller gouges or indentations. Do not leave any excess of spackling on surfaces that will be coated with epoxy.
-
For wood planks or sheets, you can spray alcohol (let evaporate) in the low spots and apply a slurry mixture to those low spots.
-
Same with tile, saturate those grout lines with alcohol (let evaporate) and apply your slurry mixture to the low spots.
-
Any rollout vinyl floors that are well adhered but are curling up on the edges - cut those off and fill the lows with the slurry. Loose vinyl tiles and LVT planks- remove and fill the lows with a slurry.
A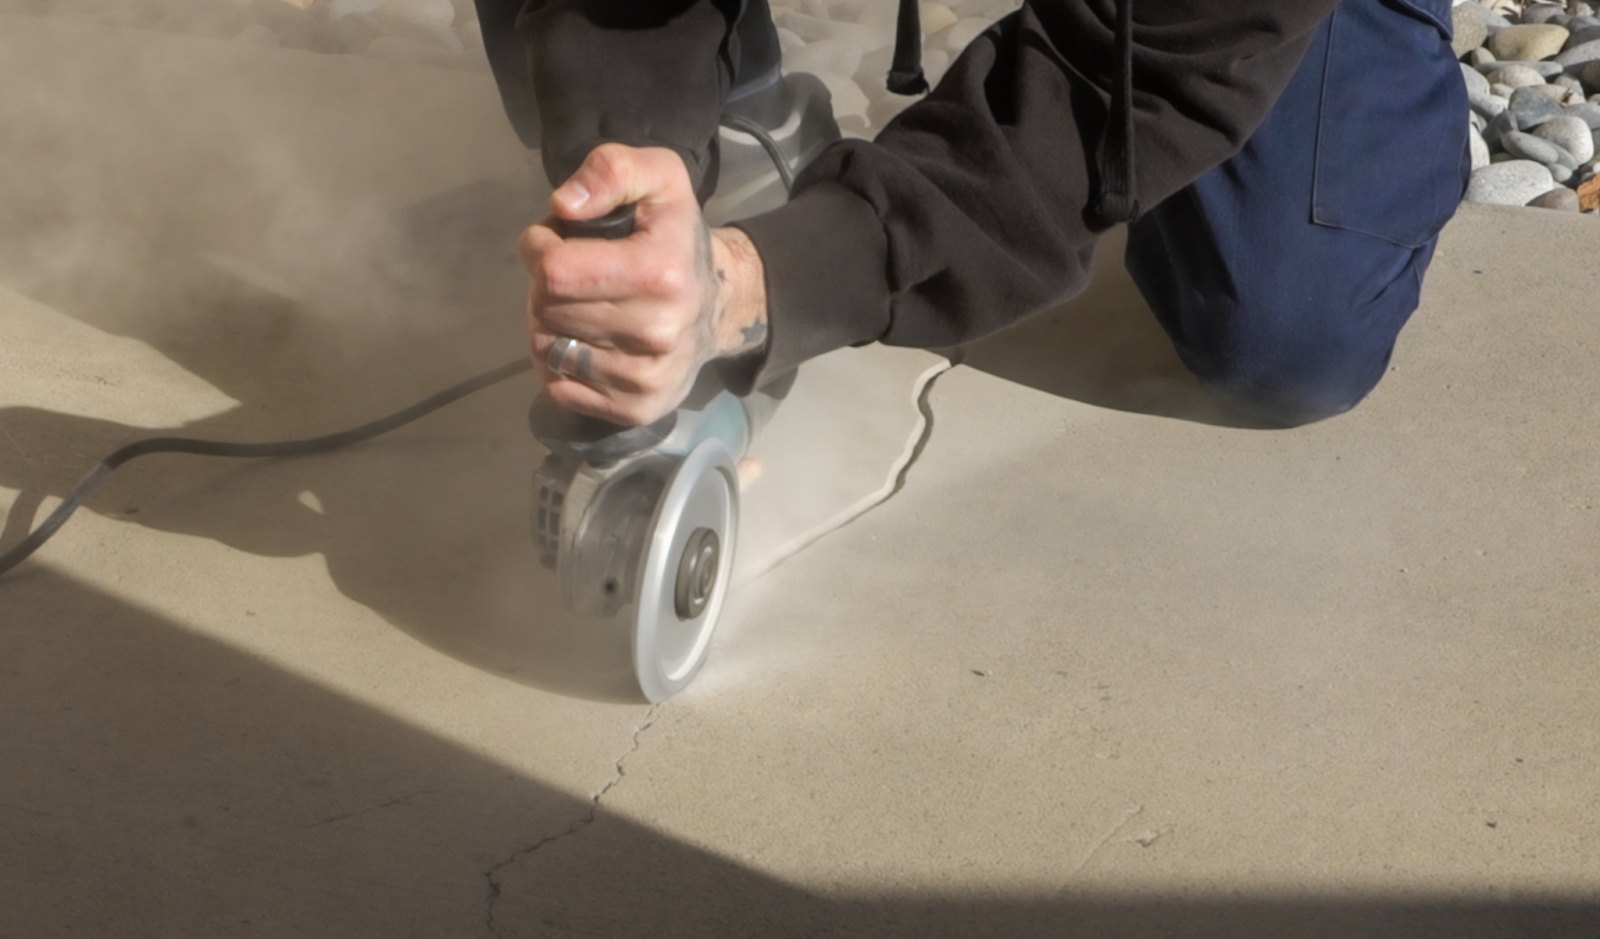

C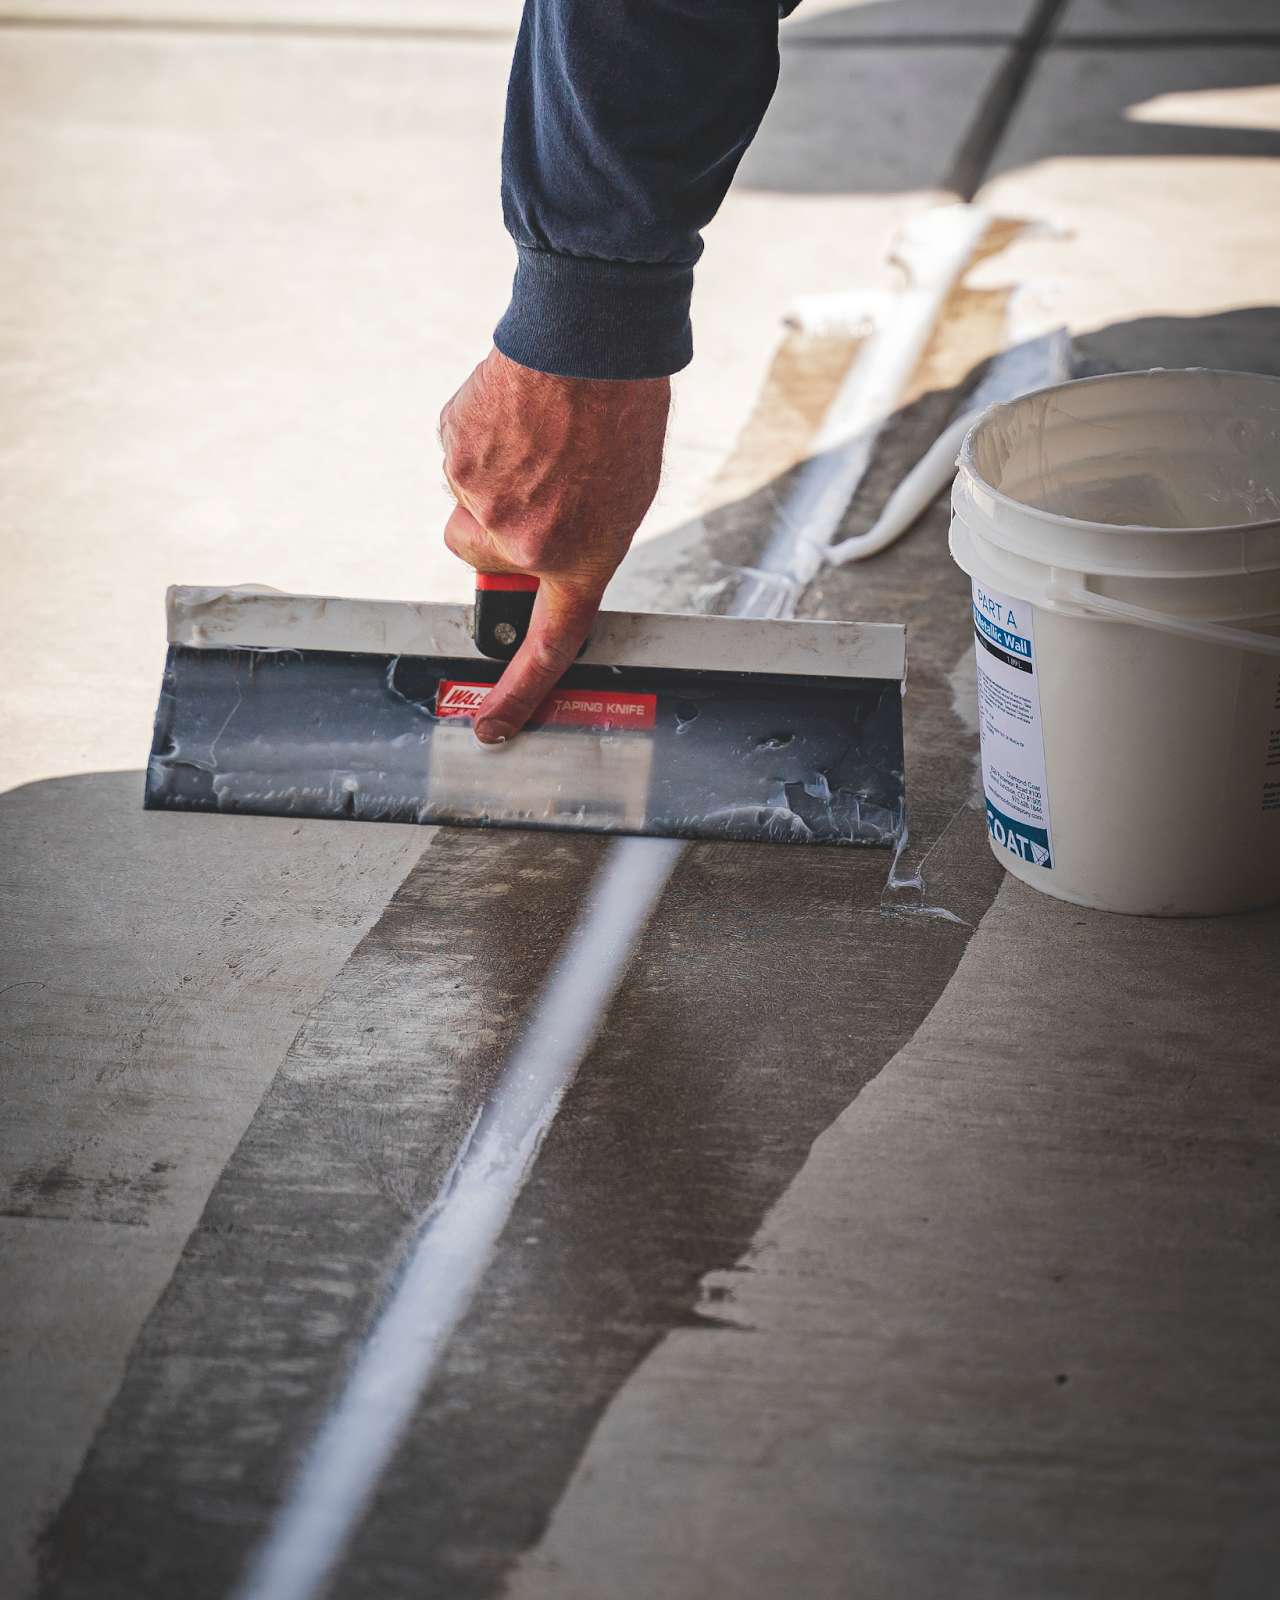
E

Sand the highs
After your patch work has cured, sand any and all high spots to level the entire substrate with the rest of the floor. If the floor is significantly unleveled - you may need to grind which is a more aggressive but effective approach to addressing significantly uneven floors.
When working on a smooth concrete substrate we still recommend conducting a light sanding to remove any failing or weakly attached previous sealant or product, but also to create a slightly textured surface for the best epoxy adhesion possible. Vacuum all your dust and debris and then clean the floor with alcohol!
-
Remember, a smoother floor will yield a smoother end result!
-
Epoxy is only as leveled as the substrate you are pouring on top of.
Alcohol
If you haven't noticed, we like our alcohol. We like to use 91-99% isopropyl alcohol not only to clean surfaces and substrates, but we also use it to expel moisture from the surface of a floor we’re about to work on. Right before we apply our epoxy, we saturate roughly every 500 square feet with about 1 gallon of isopropyl alcohol. You can use a moisture reading gun to ensure the area is in the single digits, but be mindful that this number can vary throughout the entirely of the slab.
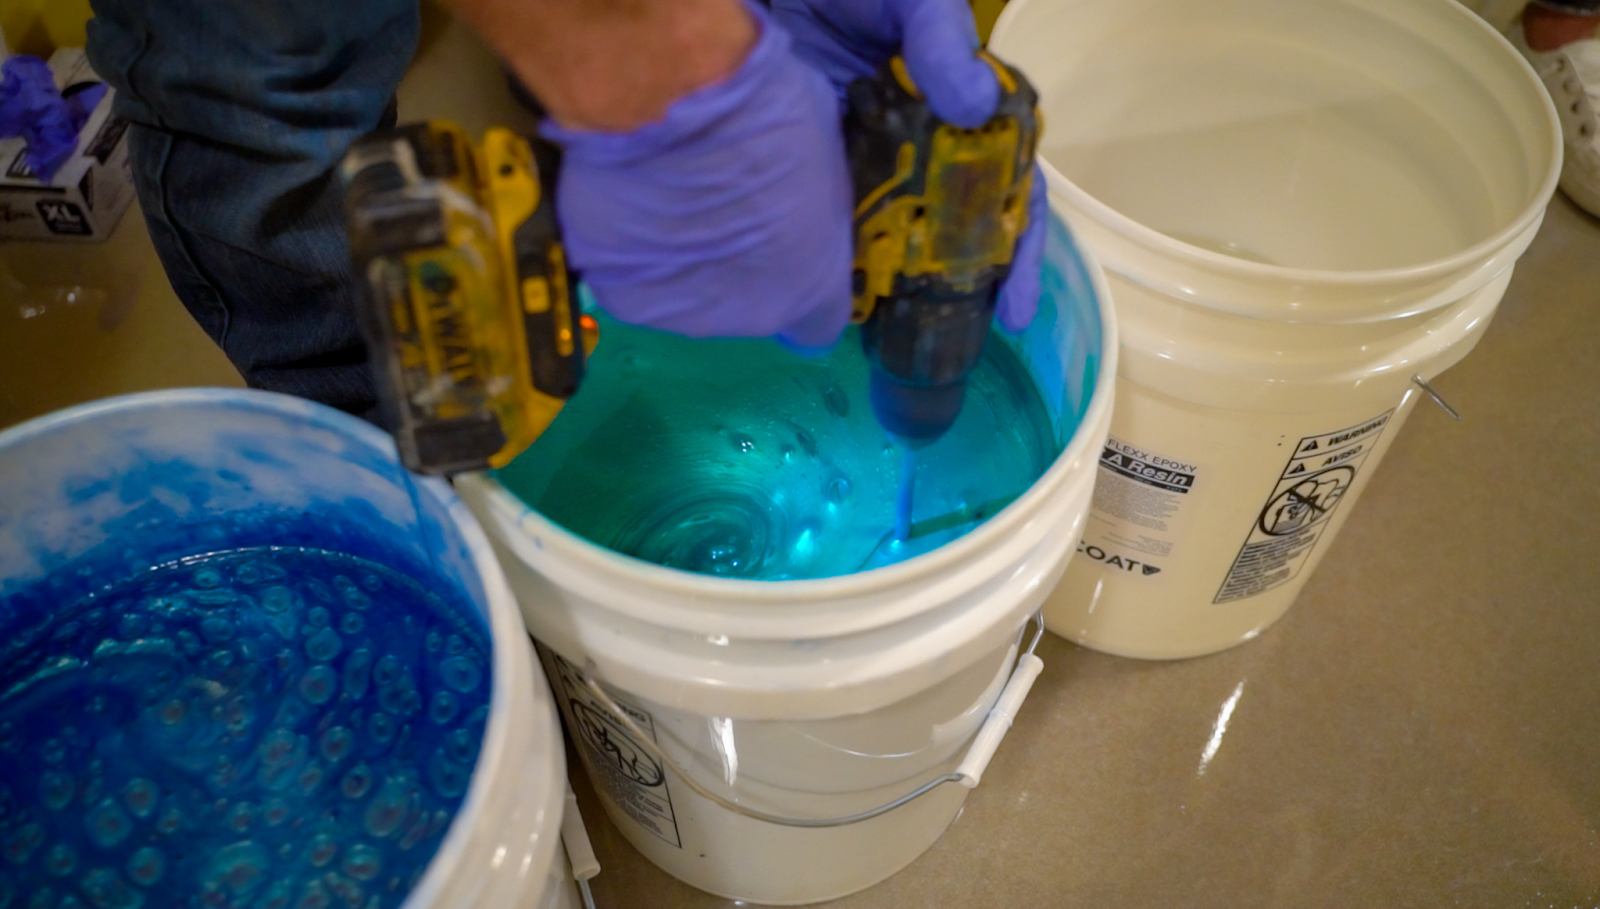
Step 2: Mixing Epoxy
Our Flooring Epoxies are a two part system.
Our FX Gloss Epoxy is a 2:1 ratio with a somewhat naturally thicker consistency. This product can be used for colored or indoor clear Flood coat applications!
Our Ultra Flex Epoxy is a 1:1 ratio and although more fluid than the other flooring epoxy, you can build up the mil height without a problem. This is specifically used for colored Flood coat applications only and tends to be a little more forgiving in that it can achieve a cure in cooler environments below the Goldilocks temperature zone in comparison to most other epoxies.
Whether you are doing a Skim or Flood coat, pour the correct ratio amount (of whichever flooring product you are using) of your Part B Hardener into the Part A Resin bucket. Use additional mixing containers for more manageable batches if needed.
-
If you’re about to do a flood coat with several different colors, have additional buckets per color if needed, and pour the correct ratio amounts of your resin and hardeners into those individual buckets.
For Flood coats with color, add the correct amount at this time. Be sure to conduct a stick test! With a sharpie draw a shape/letter on your wooden stir stick. Once you've added color (ratios in Step 4), mix thoroughly then pull that stick out to see how transparent or opaque your epoxy is at that time. If you can see the sharpie shape/letter then you have a somewhat transparent epoxy; if you cannot see it then that indicates a full color blocking epoxy. Most people want a colorblocking epoxy flood coat as they do not want to see the previous substrate underneath.
Mix thoroughly, not vigorously, for 5 minutes. While mixing be sure to periodically run the mixing stick along the walls and bottom of the container and off the stick - and continue to mix. Immediately pour out all of the product onto your substrate once complete! So long as temperatures and mixing time frames were within the recommended thresholds you should have roughly 45 minutes (give or take) of a working time frame when working with our Epoxy Flooring Products. Be methodical on where you start and where you plan to finish.
-
Please note that running the stick along the interior of the containers will help ensure all of the epoxy gets thoroughly mixed together. Unmixed product can result in tacky spots throughout your epoxy pour.
-
A plastic paddle mixer can be used for 2+ gallons at a time however this must be conducted at a consistent slow enough speed to avoid creating microbubbles or a vortex which will incorporate bubbles. Turn on only when fully submerged; shut off prior to removing. A stir stick is still recommended for the walls and floor of the containers.
-
Never leave mixed products unattended as the product will continue to increase in temperature and will flash cure!
-
Experienced epoxy enthusiasts can temperature gun their product and pour it out at a hotter temperature. Again this is recommended for individuals well versed with our products as this process will help achieve a slightly harder cure but it will also cut back on your working time.
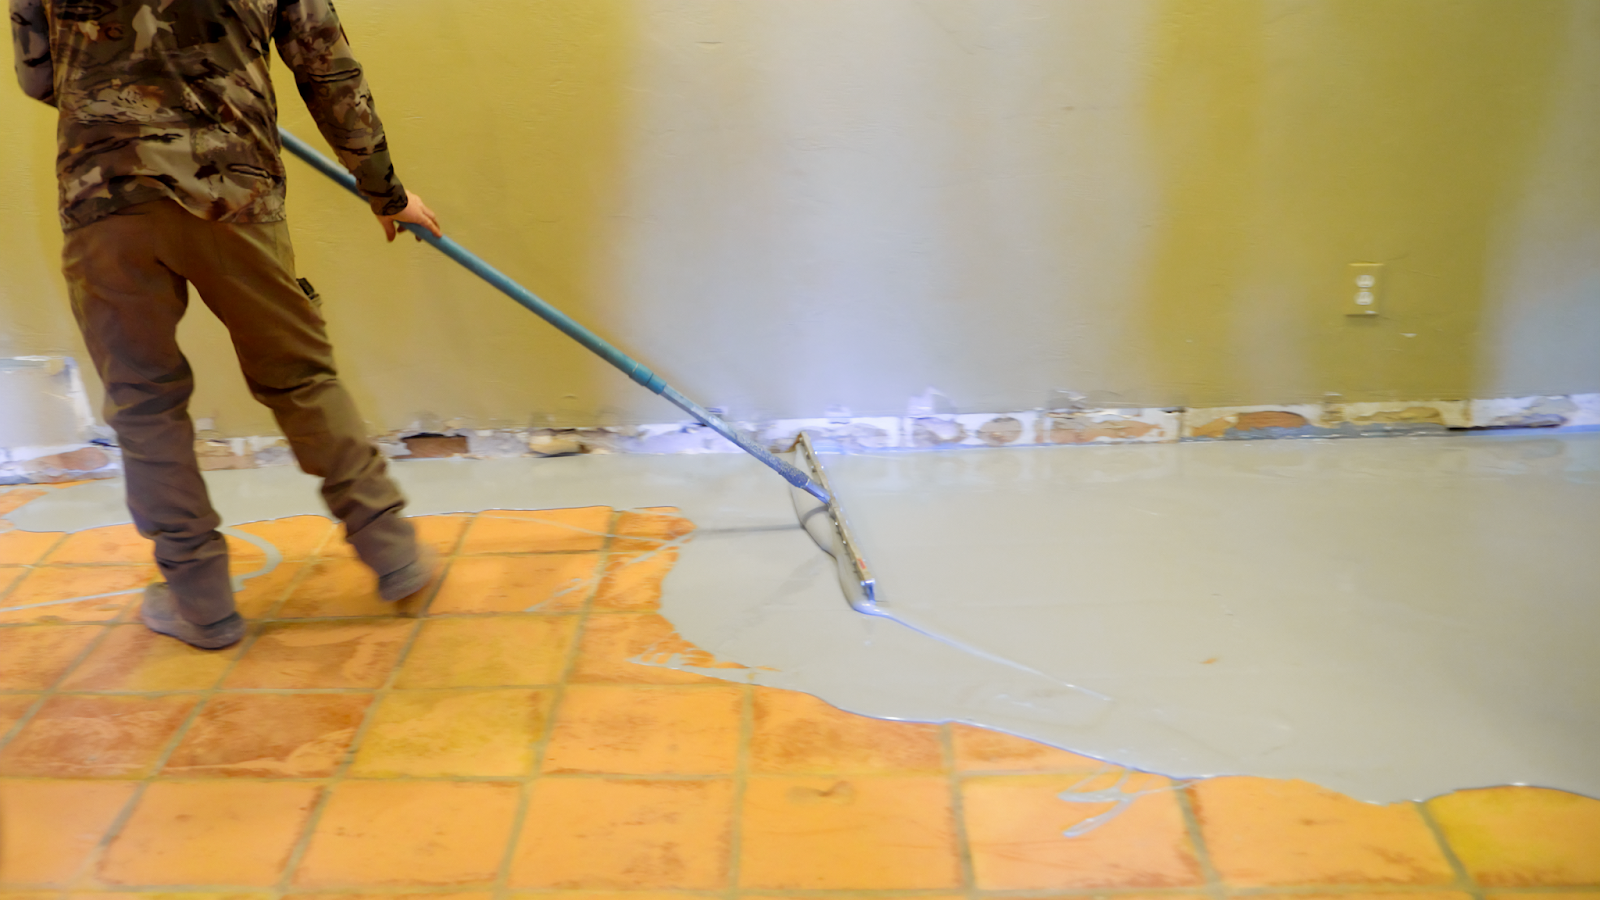
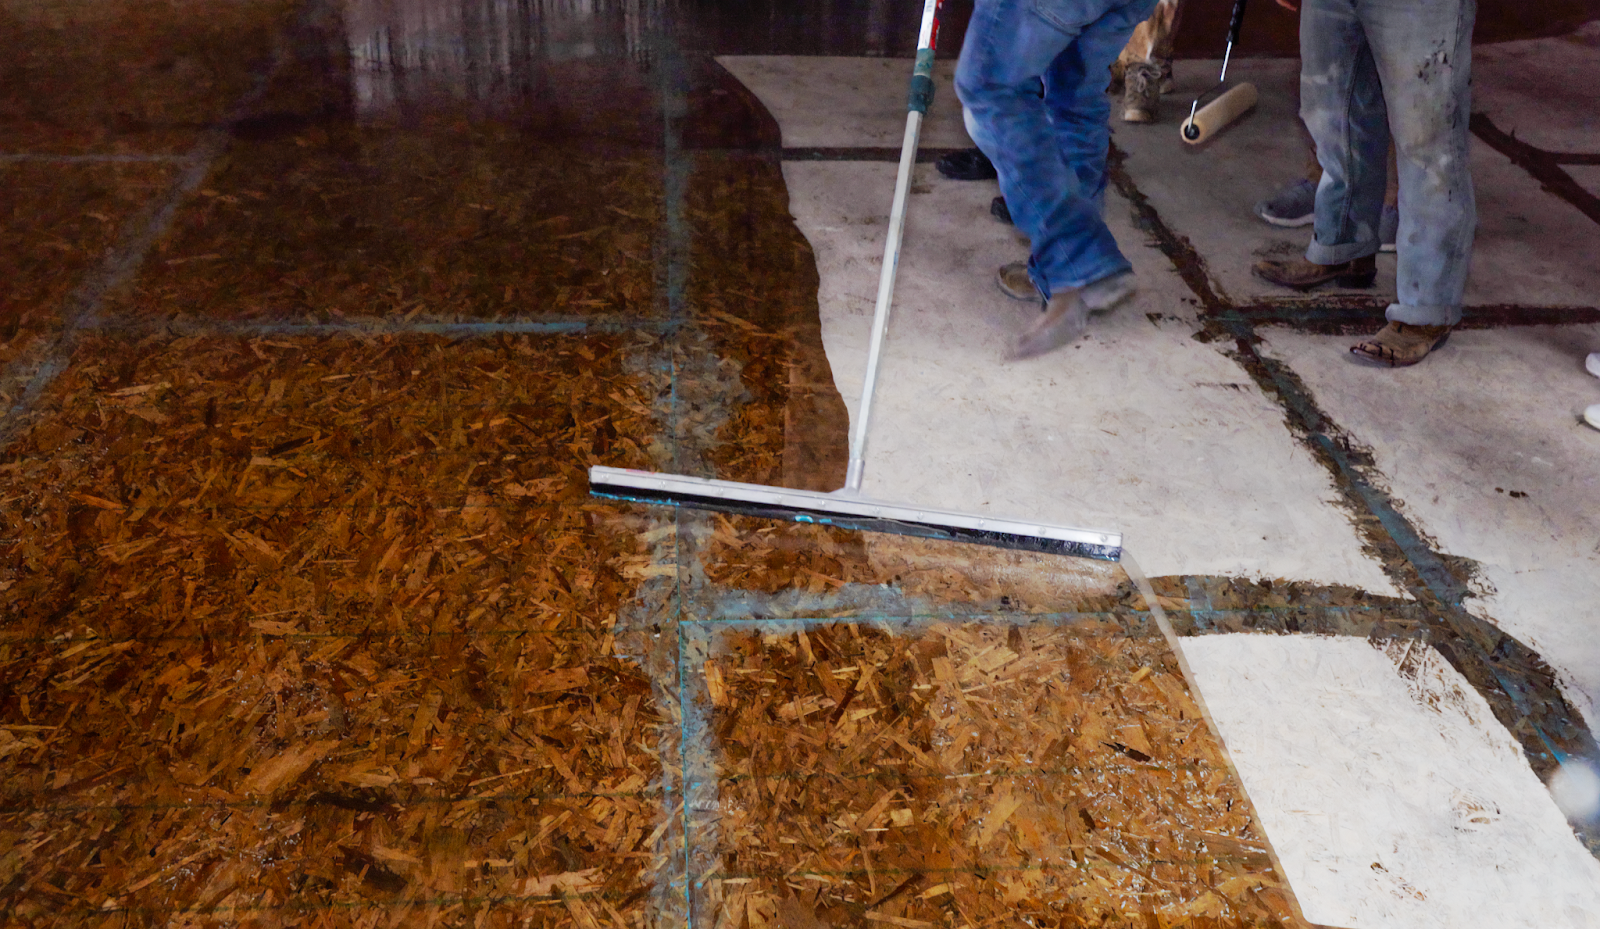
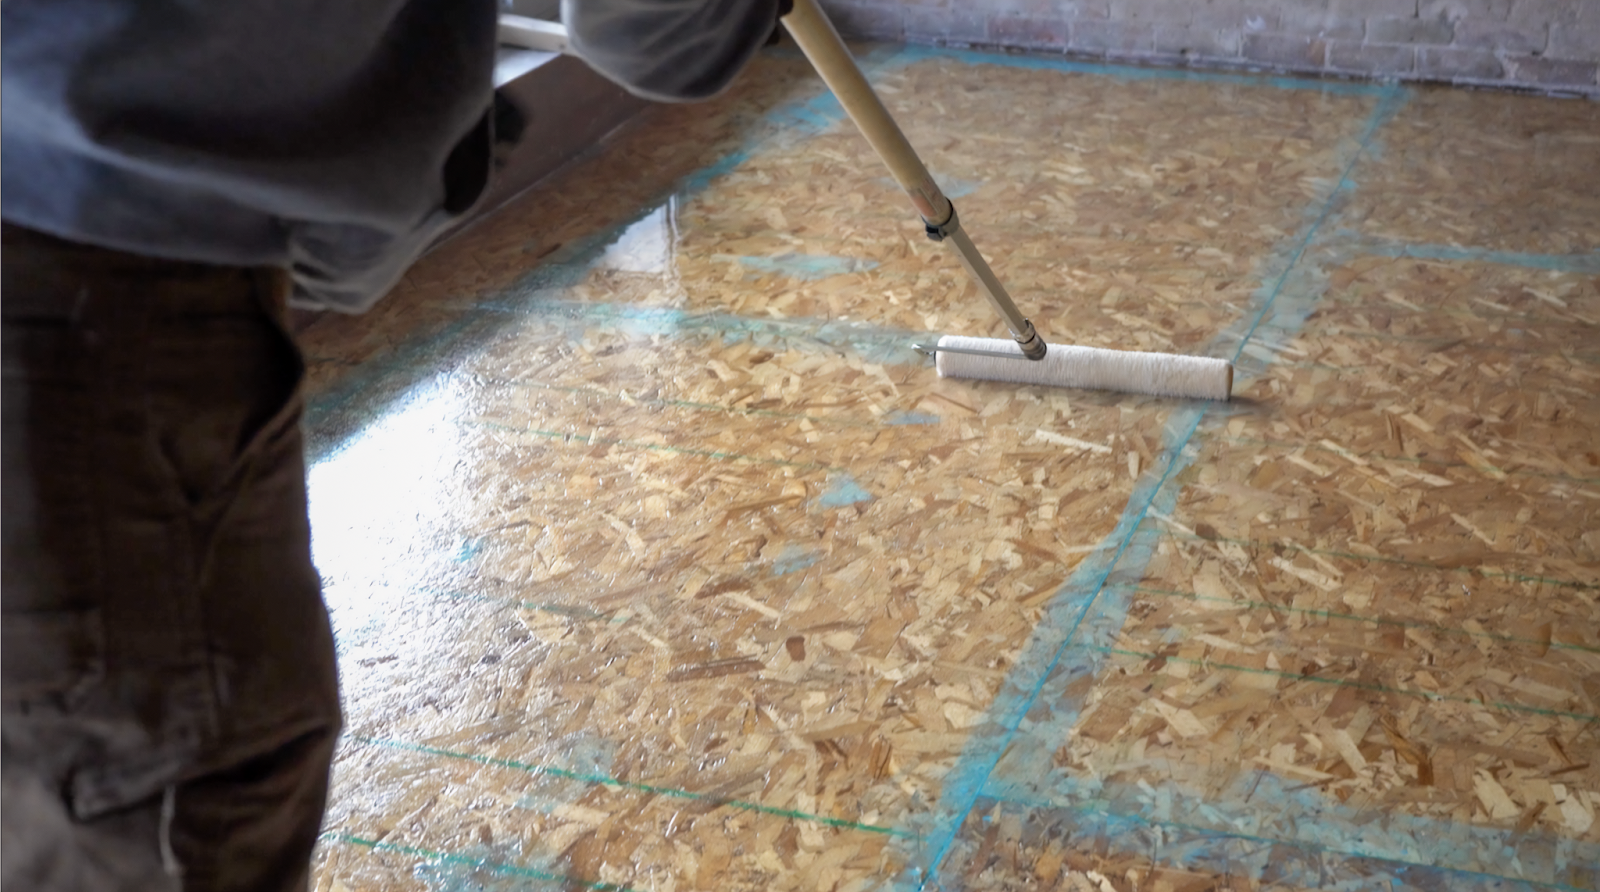
Step 3: Skim Coat
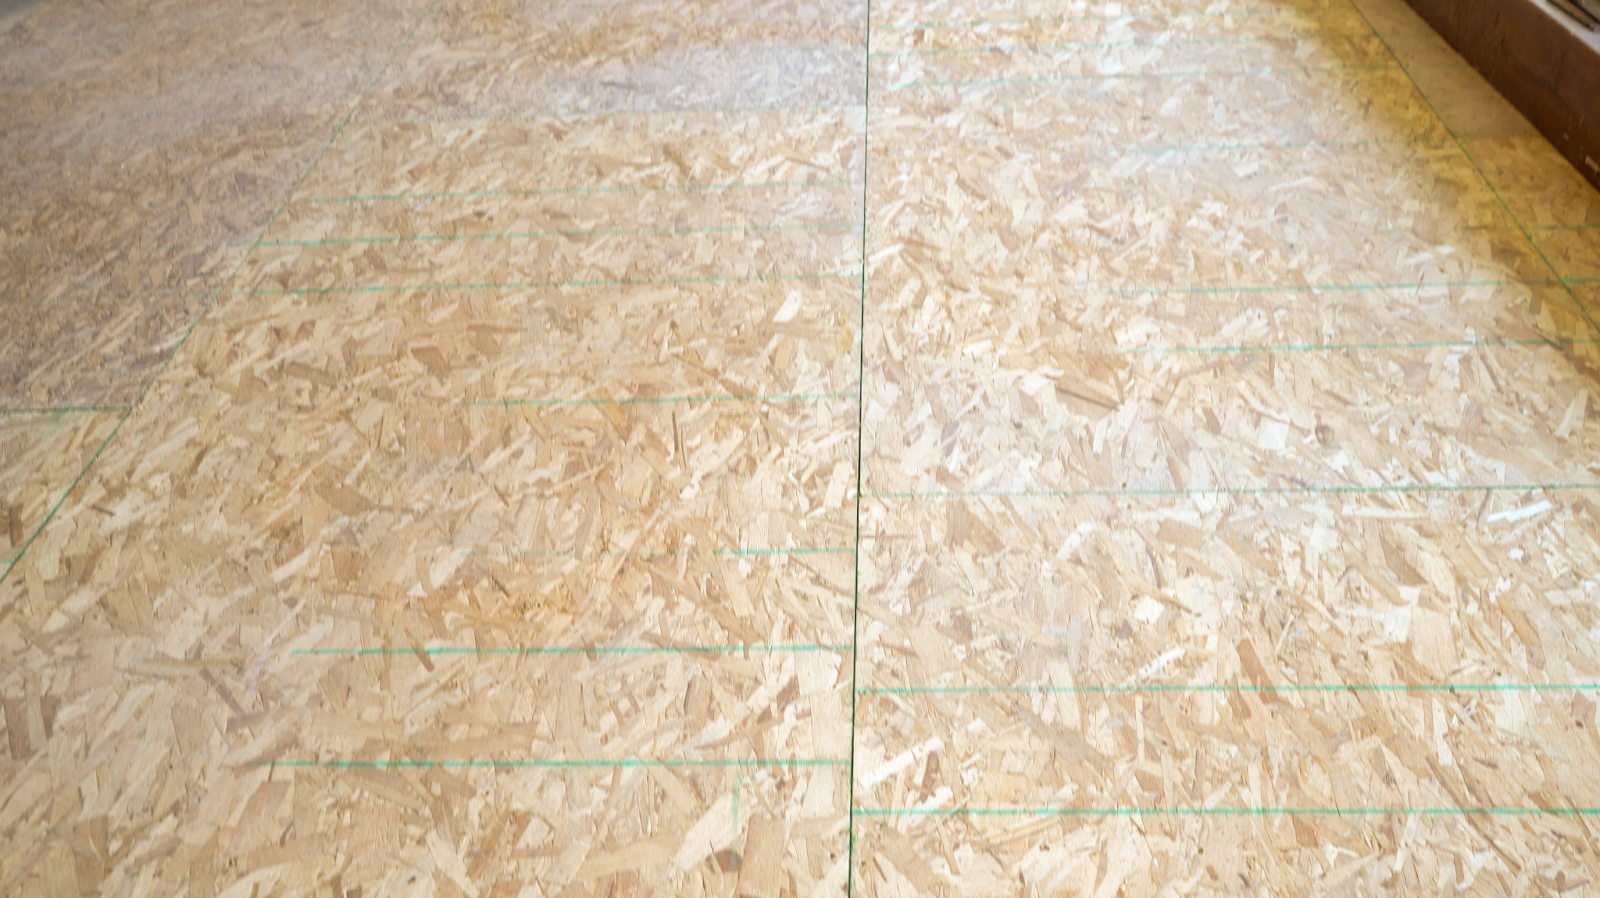
Porous substrates such as untreated concrete or wood and some natural stones - will require a Skim coat. Note that some substrates are more porous than others and can require more than one application.
Non-porous substrates such as MDF, laminate, fiberglass, and metals are not porous and do not require a Skim coat meaning you can proceed straight to your flood coat! Be advised some substrates claim to be sealed or were sealed years ago. Conduct a water test to see how absorbent the substrate is. If unsure - better safe than sorry!
-
Tiles aren’t porous but grout lines are!
-
Vinyl tiles and LVT’s require a skim due to the areas in between needing to be sealed.
-
We recommend working with kiln dried wood if possible and concrete that is at least a month old
Skim coats seal a substrate. This prevents air bubbles from rising into your final pour known as your Flood coat, and yields a smooth flawless finish. Typically we pull 1 gallon of clear mixed epoxy up to about 125 square feet. Once the batch of epoxy is mixed and ready to go, we slowly pull the product across the substrate with a steel blade or firm squeegee. You can then crossroll the skim coat with a foam roller as this will help push it into the substrate but also pick up any light excess product on the surface. Your substrate should simply appear, ‘wet’. Remember, nothing is needed to pop bubbles as the application should be thin enough to allow air bubbles to easily pass through.
-
You can add 10-20% of acetone to your skim coat mixture to help make the product more fluid and seep into the substrate better. Bear in mind this will likely get you extra square foot coverage so consider starting with a slightly smaller batch than what your calculations were when estimating your skim coat amount. If you run short, no big deal, make another small batch and finish with the application.
-
Acetone only gets added in the initial skim coat mixture, ever.
-
Never add acetone to a Skim coat when working with vinyl as it will loosen the glue underneath.
-
Some substrates are more porous than others and may require more product per square foot or perhaps additional Skim coats to ensure the slab is sealed.
-
Skim coats should cure within 12-24 hours. Inspect the Skim coat, if there are any inconsistencies or concerns those must be addressed prior to moving onto the next step!
-
Do not add color to a Skim coat since the purpose of a Skim Coat is to seal a substrate.
Step 4: Flood Coat
Flood coats are your final aesthetic applications that can be clear or colored; again for clear coats use the Gloss only. On average we pull 1 gallon of mixed epoxy up to about 50 square feet.
-
What if I want to pour thicker? If you weren't able to get a perfectly smooth floor, you're apprehensive about pulling the product too thin, or you simply need to raise the height of the floor - you can certainly pour anywhere from 45-25 square feet per gallon.
-
What if I want to pour thinner? For perfectly leveled floors and someone experienced with our products, you could pull the product 60-75 square feet per gallon. Bear in mind, epoxy can and will fisheye over high spots or areas pulled too thin. When pulling so thin, the likelihood of noticing somewhat transparent patches of epoxy can happen, especially over high spots.
With this information in mind, don't be super frugal! Always have extra epoxy on hand for the just-in-case situations in life. Sometimes we undercalculate the square footage, poured too thick early on and don't have enough to finish the project, or even spill. Life happens, we get it. Just remember, “fixing” a floor will almost always yield a seam. Be prepared with extra epoxy and colorants so that you don't have to redo the entire floor.
-
For larger square footage projects: plan, plan, plan.
It is recommended to have helpers for projects over 200 square feet. Have an idea as to how much and how far the epoxy will cover; have your colors on standby already opened just waiting to get mixed; have a system on who will mix, who will keep track on time, and who will pour. -
Everytime you pour a new bucket onto the floor, lightly overlap that pour onto the edge of the previous pour.
-
For a seamless finish - never stop in the middle of a project. If you must stop somewhere, do your best to do it at a doorway or smaller opening as that will result in a much smaller seam.
-
Flood coats should cure within 24 hours though we recommend waiting 48 hours until you walk on the floor and a couple extra days before moving furniture back onto the surface (remember never drag the furniture, lift)!
There are two ways we color our epoxy: liquid pigments and metallic powders. Our color line is color stable, UV resistant, and designed to cure with our epoxy. We would encourage you to stick with our product line to ensure the best long lasting results possible.
-
1 x 12 ounce Liquid Pigment can color 2 gallons of our Ultra Flex Epoxy
-
1 x 12 ounce Liquid Pigment can color 3 gallons of our FX Gloss Epoxy
-
1 x 175g bag of specifically selected Metallic Powders can color 2 gallons of our Ultra Flex Epoxy
-
1 x 400g bag of specifically selected Metallic Powders can color 3 gallons of our FX Gloss Epoxy
-
Ultra fine glitters, glitters, and translucent colors will not color block - these are typically used for accents
-
Review the product description of your desired colors or call the office to inquire.
-
Use glitters in clear coats for optimal results!
Once your mix is complete and has been poured out onto the substrate, use yourT-bar Applicatorcovered with our T-bar Covers to lightly pull and guide the epoxy. Always work the border areas first = cutting in. Pull the product slowly so that you do not splash epoxy up onto the vertical walls. After you’ve done that then work the rest of the area. Repeat this process with each poured bucket as you continue to move from one section onto the next.
-
Flood coats can receive a second flood coat application or sanding within 24 hours.
-
Conduct a wet sanding if you’d like to keep the debris from floating in the air and/or if the epoxy is still pretty fresh and begins to get gummy
Step 5: Accent colors in your Flood Coat
Accent colors must be added to your Flood coat prior to it curing - this may go without saying but, let’s make sure we're all on the same page.
There are three methods in which we add accent colors.
-
For a more granular look we add metallic powder to a spray bottle with 99% isopropyl alcohol:
Our commonly used metallic powders come in 25g, 175g, and 400g bags. Usually we pair 1 pint of isopropyl alcohol with a 25g bag of powder. For larger projects you will likely need to raise these quantities. In terms of powder and alcohol ratio’s - you can't mess this up. Add some powder to the alcohol bottle then conduct a spray test. If the spray is too sparse - add more metallic powder. If the spray is too condensed - add more alcohol. A methodical design technique would involve spraying more heavily in certain areas and lighter in others. Remember, glitters are just that, they are not metallic powders and will clog your nozzle. -
For veining we add metallic powders or liquid pigments to a batch of epoxy:
The amount of accent epoxy you decide to use is up to you! Please reverent to Step 4 to see epoxy-to-color ratios. Remember, not all colors are color blocking, so ensure that you read the description or call the office to inquire. When veining, typically we like to use a wide flat surface (a piece of cardboard or dust pan) to pour the accent into, we spray isopropyl alcohol on the surface of where we’re about to pour, and then distribute a wide yet thin consistent layer of epoxy. Begin your pour off the countertop so that the first large dollop doesn't land on your project. The alcohol applied prior to the vein and the alcohol sprayed afterwards should help the veins separate and spread out. For more singular veins simply use a small container or paint brush and aim across the table; do not do zigzags or circles.
-
For dirty pours we add metallic powders or liquid pigments to a singular or multiple batches of epoxy:
The amount of accent epoxy you decide to use is up to you! Please reverent to Step 4 to see epoxy-to-color ratios. Remember, not all colors are color blocking, so ensure that you read the description or call the office to inquire. When adding multiple colors to a project, remember that you must work within the working time frame of your Flood coat application and never leave product in a mixing container longer than recommended otherwise it can flashcure! It is advised to have a helper mix colors and to consider working with Black Label Epoxy as that product naturally has a longer working time frame.
-
For a more marbled appearance we add metallic powders or liquid pigments to batches epoxy:
This design calls for at least two colors although more can be added - just remember with multiple different colors that need tended to, one should have help and proper planning. Typically these floors have an equal percentage of colors throughout the project (ex: 33% blue, 33% green, 33% white). Those percentages can vary if desired. Take your first batch of colored epoxy and do dollops throughout the project. Grab your second batch of color and do dollops in the remaining bare spots of the project. Continue this process with each additional color. With your T-bar cover, begin to lightly blend your dollops ensuring all bare spots are covered. Do not over mix the blends otherwise it will appear more muddled than marbled. Be prepared with an extra foam cover if you’ve overblended and want to eliminate the transfer of overblended colors.
-
For veining or dirty pours we add metallic powders or liquid pigments to a batch of epoxy:
The amount of epoxy you decide to use is up to you! Please reverent to Step 4 to see epoxy-to-color ratios. Remember, not all colors are color blocking, so ensure that you read the description or call the office to inquire. When adding multiple colors to a project, remember that you must work within the working time frame of your Flood coat application and never leave product in a mixing container otherwise it can flashcure! It is advised to have a helper mix colors when adding multiple colors.
Step 6: The final touches!
More alcohol!
After everything has been poured and is aesthetically to your liking, we spray alcohol. This will help pop any remaining pesky bubbles that are having a hard time breaking through the surface and popping naturally. Typically we use about 1 gallon for every 1000 square feet. Remember to spray the alcohol within your working time frame - if you spray it too late in the process, the epoxy will have a hard time releveling any divots left from the weight of the alcohol. We never use a torch, ever!
Urethane & Traction
Urethane is typically something we recommend on floors that endure a lot of traffic or floors where one may encounter mechanical oils more than your average floors (ex: garages where you work on vehicles or other machinery that contains oil). Please review the Urethane Instructions for a proper application.
If you’re needing some traction we offer traction powder. Traction powder is added to the Urethane mixture and a respirator is required for such applications. Please note that this application does yield a textured end result. For more information please review the Urethane Instructions.
Another traction option is glass beads, here you have some application options.
First, after a Flood coat has cured and you can walk on it, conduct a very thin skim coat on the surface and broadcast your beads either by hand or with a mini leaf blower by slowly dumping them into the impeller (the fan). This is a better option for larger square footage projects.
Second, after a Flood coat has been poured, wait roughly 2-3 hours for the coat to firm up a bit. Remember everyone's project is different and may cure at a different rate. From there you can broadcast the beads. This is fine for smaller projects but not a great option for larger square footage projects as you won't be able to walk to the far ends of the room without leaving shoe spike punctures throughout the floor.
Urethane can be applied afterwards if desired. If you had already planned on applying Urethane and glass beads to your Flood coat, instead of doing a thin skim of epoxy and then sealing it with Urethane - simply apply a thin coating of Urethane and broadcast your glass beads in that coat. No additional sealant needed!
As a reminder - the use of glass beads will yield a textured end result.
Please see our SuperTraxx section if you are interested in decorative concrete finishes that also offer traction!
Clean Up
Once your pours are complete, start cleaning up the utilized tools. Be mindful of epoxy on your gloves, clothes or shoes as it can easily be tracked throughout the working space. Keep all masking there until the job is complete. Remember, any painters tape or foil tape left overnight will bond to the epoxy and be quite challenging to remove the following day. We encourage removing such things roughly within 2-3 hours once the product is somewhat firm and not as fluid. If you have any excess epoxy left over in buckets, simply let it cure before throwing it away in order to prevent additional messes.